Welcome to my Home!

Thanks for stopping by! I'm so glad you're here and hope you take the time to look around. There's going to be a lot of before and afters, ideas, inspiration, tips, tutorials, and whatever else I come upon during my journey of home renovation and decoration. We'll see where it takes us!

Showing posts with label Thrifty Finds. Show all posts

Friday, October 21, 2011

Perfectly Imperfect Wreath {DIY Decorate}

It doesn't seem right that I could love this wreath as much as do... but there it is.  Something about the perfectly imperfect nature of this wreath just makes my heart happy.


 I love the color contrasting off the bright white of the frame... I love the frou frou nature of it's frills against the rough and weathered wood.


There's alot of these floating around bloggy land and I was dying to try one out for myself.


If you are so inclined to try one out for yourself... here's how I made mine~

Fire up the trusty glue gun (mine has seen better days!) and pick out some ribbon.

Gather up some foam pipe insulation, about two packages of coffee filters (you can get these in white or natural), and some gorilla tape or duct tape.

You can find the pipe insulation at Home Depot (or other hardware stores) in the plumbing section.  There were five pieces in a packag priced at $2.47.  That's less than .50 per wreath form! 

Hold the edges together while you wrap the tape around it.  It's tricky, but keep those edges together so that your form ends up being circular instead of oval.


Don't worry if it doesn't look perfect, you just want a general shape... it will all be covered up soon.


Now, grab your coffee filters.  You can either fold up a bunch and start gluing or you can fold-glue-fold-glue.  I personally needed the time in between each gluing to recover from glue burns.


So, you will fold it in half, then into quarters...

...then into eighths.  I also folded the tip down to give a better surface to glue on.  Apply glue to the tip.  I found it important to let the glue cool for a moment.  If it's too hot it will melt the foam.  I'm sure this could be remedied by using a low heat glue gun.
Lay the form flat and start gluing, layer by layer.  I found it to be helpful to stagger the layers (like bricks) as you add each layer.  

There you have it.  I wasn't very anal about it and I personally like the casual look I ended up with.  It makes me happy every time I look at it! 


Saturday, October 8, 2011

Beachy Wall Art

One step closer to a finished Master Bath!


Pinned and Completed! 
I found this gorgeous mantle on Finding Home and absolutely FELL in LOVE with it.  
*Sigh*... isn't it beautiful....?

I pinned it and knew that there had to be a way to incorporate something like this into our Master Bath.  It would bring exactly that touch of beachy coastal feel I wanted without being too kitschy.


Our Master Bath has been {almost} done for several months weeks now.  In my process of procrastinating with the painting of the kitchen cabinets I decided to take an afternoon and get some decor up in our Master Bath.  

I hauled out an old window frame I had picked up from a garage sale for $5.  I added a couple layers of sisal twine and grapevine wire.  From that I hung some sea stars that I had picked up from Michaels, glass mason jar lids and some of my grandmothers shells that she had collected from the Connecticut shore near her home.  I thought it was a great way to display some of her collection.  A glue gun is all it took to hold everything together.  


It's not exactly like my inspiration pin, but I'm pretty happy with the overall look!


The DIY Show Off
Tip Junkie handmade projects
Nifty Thrifty Tuesday at Coastal CharmTutorials and Tips

Thursday, September 22, 2011

September Porch {Decorate}

As busy as I've been inside trying to get the kitchen painted, you all know I got sidetracked a bit cleaning up my new rocker.  She was definitely a trash to treasure project! I was feelin' pretty crafty getting my "no-sew" skills on with the cushion.  So finally here is my front porch.  I think I got it spruced up just in time to decorate for Halloween!


Here's a whole porch shot- That would be my little guy trying to scare away the ginormous spider that lived in the corner of the porch.  I think he was doing a pretty good job looking fierce! Although you can't see the front door, you aren't missing anything. There was nothing on it!

Yes, I know... you are overwhelmed with the color and creativity! Ha!


Some of the changes I made weren't just to take the front porch from Summer to Fall, but to update some features of our new home that simply weren't working for me. Take a look at our doorbell... I mean for real! Would you want to come ring my doorbell if it looked like this?? {ICK!} It's part of our whole house intercom system (which apparently was quite popular 20 years ago).  


First order of business was to break out my trusty auto body spray primer, fine grit sandpaper, and Oil Rubbed Bronze Rustoleum spray paint.  Sand, prime, and paint... and the doorbell at least won't scare visitors away anymore!


Ahhhh..... so much better!

I picked up the "Fleurs" hanger at a garage sale for free (yes! same place I got that free drop cloth I mentioned when I re-covered my chair cushion)

I used one of my 3M hooks that are removable.  It was originally brushed nickle, but a hit of ORB spray helped pull the look together.


Any idea what to do about the glass block, short of ripping it out? It's not my favorite look, but I'm not sure what to do with  it!


I was  bit delayed in getting this post out because I was looking for a pot for the orangey colored mums.  I happened onto a pedestal pot at the dollar tree on clearance.  I snatched it up for $1.50 and hit it with some spray paint.  Problem solved!

Stick bundles in a basket. I love this simple kind of decorating.  I plan on adding more through the fall.

I've already got some things ready for Halloween, I won't put those up until the first week of October.  For now we dedicate September to all the kids birthdays! : ) 

Monday, September 12, 2011

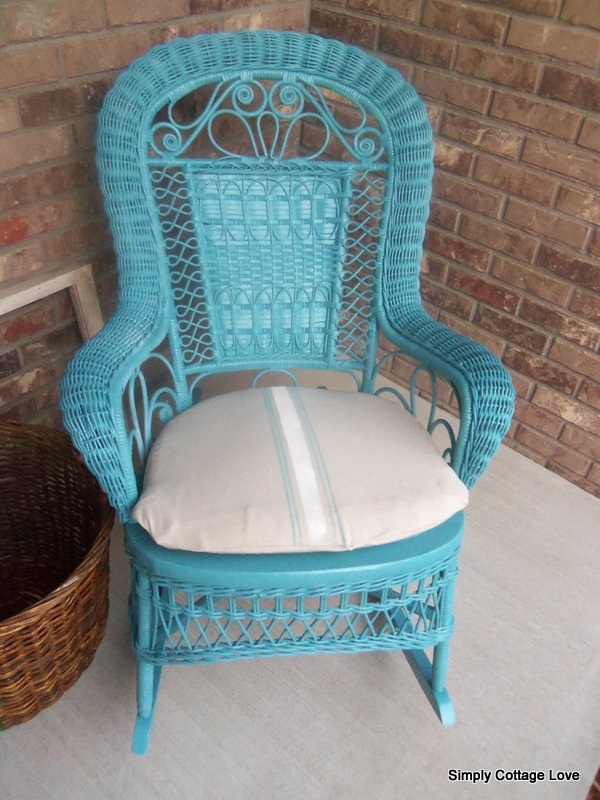
Turquoise Rocker {DIY}

Lucky for me the MIL is is downsizing... sweet!  I have been the lucky recipient of two couches, an entertainment hutch, a rocker, and a coffee table, to name a few.  And that's just in the last couple of months.  Good for me she has great taste! Here's the latest giveaway (almost throw away) off my mother in law's front porch.  Supposedly she bought this years ago from an antique shop.  Looks like it's had better days!

This is where we started out-  layers and layers of paint, a torn woven seat, and a variety of injuries endured through the years.  So we ripped out the seat, knowing there was no way we could fix it.  We had to come up with a new plan for that seat.


There's nothin' that Gorilla Glue can't fix (what?! you broke your gorilla?!).  Love this stuff, I've used a few times now and have been really happy with the durability and how easy it is to work with.

We grabbed some wire brushes and went to work.  Even the kids loved helping with this job.  It was hard to get to a point where the paint would stop chipping off, but we tried to get as much off as possible to get a good base for the new paint.


We had to get creative to make a new seat~

I used some scrap bead board I had laying around from the kitchen project and cut a new seat (thanks sweetie!).  A little adhesive called Power Grab and the handy dandy nail gun and she was all set!

  I got busy with a good solid coat of spray primer.  And then came the fun stuff!

Whhhheeeee! Mediterranean Blue by Valspar.  I personally haven't used Valspar before now and I'm kinda in love! I was completely suckered in by their gorgeous color choices.  I only had to go to four, count them, FOUR, stores to find this color! Sheesh.  I have love, love, loved the way this went on!  Here she is... all ready for the front porch!


Ahhh... so in love!  The color on the right is more true to life, but I wanted to show you the new seat all painted.  And you see that cushion?  I recovered the original cushion that came with the chair.  Didn't think I knew how to sew?  Guess what?  I don't!  See how I covered the custom cushion without sewing a stitch here!

Project Materials:
Wire brushes ($2.98/set of three)
Gorilla Glue- already owned
 2 cans Spray Primer- already owned ($2.98 retail)
1 1/2 cans Valspar Spray Paint in Mediterranean ($3.78 ea. at Lowe's)
 Approximate total:  $17

Not bad! I'm pretty thrilled with the results!
Pin It
DIY Club

Monday, August 22, 2011

I can get distracted sometimes... {Thrifty Finds}

I should be working on installing beadboard in my kitchen. What am I doing instead? Drooling over these new lights I found at Lowe's--- for $5 a piece!!


Yikes! I kinda loved them when I spotted them on the clearance table. And then I loved them even more when I saw the 75% off sticker.  Have you checked out your Lowe's for lighting?  They have great stuff and when you find it on clearance, that's all the better!


When we moved into this house we picked out the WORST two rooms and decided to tackle them first. First up- Master Bathroom, quickly followed by the kitchen. But somehow.... our Master Bedroom keeps ending up in the mix.

 We debated for weeks what color to paint the bathroom. We wanted a beach cottage feel. But do we go with greens? or blues? The debate went on and on. We even put a couple of patches of a seaside green up on the wall. I had picked the gallon up from the mistint table at Lowe's or Home Depot (I can't remember which). And then one day while perusing the Anthropologie website, Hubs and I both fell in love with a set of sheets.


 We ordered them, with promises that THIS will be our anniversary present to each other because there was no other way that we could ever agree to spend THAT much money on sheets. I was thankful when the arrived because FINALLY we would have some colors to work off of. But again... do we pick the pale blue? the medium blue? hey what about that coral color? Ugh. The debate continued. Until one day when we realized that the {mistint} seaside green MATCHED the minty green in the sheets. FATE had intervened! The decision was made.

So the bathroom was painted sea green and in the end we are both happy with it.  I know I keep promising the big Master Bath reveal... but I STILL can't find the perfect bathmats... and there is still some wall art to work on.  And I just want it perfect when I show it off : )

And now... when I am supposed to be focusing on the kitchen I bring home lamps for the Master Bedroom {head slap}
Yep, that's just a naked down comforter!  I'm still hoping and praying
 that Target gets the duvet cover I picked out back into stock!


Don't judge the nightstand... it has a paint job in it's future!
Maybe by the time I finish the kitchen I will have accumulated all the right accessories for the bedroom and all there will be left to do is paint!  I can dream? Right?

Now... on to installing that beadboard!

Sumo's Sweet Stuff
Related Posts Plugin for WordPress, Blogger...