Welcome to my Home!

Thanks for stopping by! I'm so glad you're here and hope you take the time to look around. There's going to be a lot of before and afters, ideas, inspiration, tips, tutorials, and whatever else I come upon during my journey of home renovation and decoration. We'll see where it takes us!

Showing posts with label paint. Show all posts

Tuesday, September 27, 2011

Holy Wow! Vinegar can do THAT?! {Tips}

Do you ever start a project and then get pulled away by one thing or another (homework help, burning dinner, or children falling out of trees?).  Yeah, I'm sure no one ever has this problem{enter sarcasm here}! Well, of course that happened to me the other night.  By the time I came back to my painting project - what did I find?  My VERY favorite paintbrush completely encased in dried latex paint.  I had (what felt like) miles of cabinets yet to paint, a sleeping toddler, an opportunity to paint... yet my favorite brush was in no condition to do so.

Somewhere in the depths of my brain I seemed to remember hearing that vinegar could clean dried out paintbrushes.  Knowing that I didn't have much to lose I dropped it into a glass full of my cleaning solution (1/2 vinegar, 1/2 water).  I came back in about a half and hour and Lo and Behold {yes! I was pretty sure I could hear angels singing!} the paint was softening.  A little work on it under some running water and the brush was good as new!

I can only imagine how well this would've worked if I had used 100% vinegar.  I looked around on line and found that many places suggest you actually heat the vinegar a bit and let the brush soak for hours.

photo via: www.tastyexploration.com
I have long been a proponent of cleaning with vinegar ever since I learned that vinegar kills 99% of bacteria, 82% of mold, and 80% of viruses.  We all know it's environmentally healthier and is SO much cheaper than buying all sorts of glass cleaners, anti-bacterial sprays, etc.

Here are some other tricks you do with Vingear:
  • Remove mold and mildew in showers and tubs by scrubbing with vinegar
  • Remove stains from linoleum by pouring vinegar on and leaving for 10-15 minutes
  • Clean toilets and disinfect cutting boards
  • Get rid of lime and calcium build up on fixtures by soaking in vinegar for a few hours and then scrubbing with a toothbrush.
  • Deodorize your garbage disposal, microwave, and fridge.

Anyway, I was so excited I had to share!  Have a great week!
Tip Junkie handmade projects

Monday, September 12, 2011

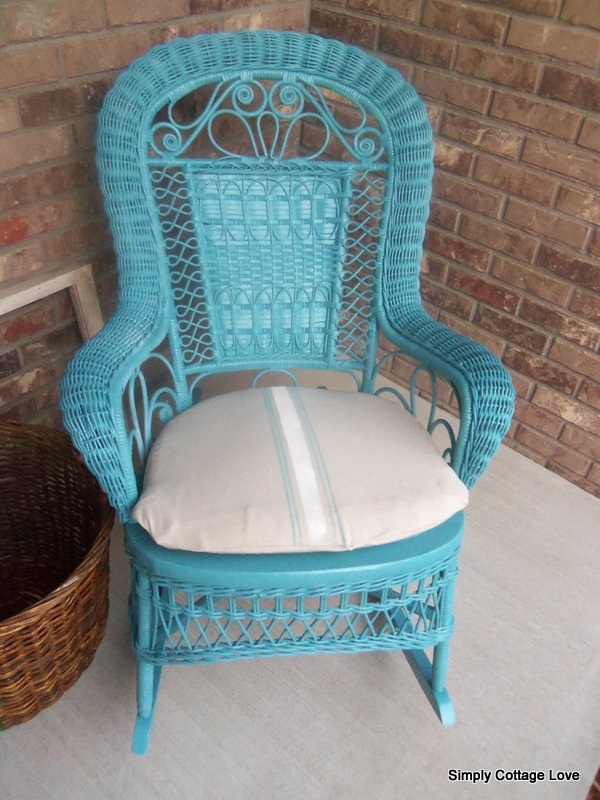
Turquoise Rocker {DIY}

Lucky for me the MIL is is downsizing... sweet!  I have been the lucky recipient of two couches, an entertainment hutch, a rocker, and a coffee table, to name a few.  And that's just in the last couple of months.  Good for me she has great taste! Here's the latest giveaway (almost throw away) off my mother in law's front porch.  Supposedly she bought this years ago from an antique shop.  Looks like it's had better days!

This is where we started out-  layers and layers of paint, a torn woven seat, and a variety of injuries endured through the years.  So we ripped out the seat, knowing there was no way we could fix it.  We had to come up with a new plan for that seat.


There's nothin' that Gorilla Glue can't fix (what?! you broke your gorilla?!).  Love this stuff, I've used a few times now and have been really happy with the durability and how easy it is to work with.

We grabbed some wire brushes and went to work.  Even the kids loved helping with this job.  It was hard to get to a point where the paint would stop chipping off, but we tried to get as much off as possible to get a good base for the new paint.


We had to get creative to make a new seat~

I used some scrap bead board I had laying around from the kitchen project and cut a new seat (thanks sweetie!).  A little adhesive called Power Grab and the handy dandy nail gun and she was all set!

  I got busy with a good solid coat of spray primer.  And then came the fun stuff!

Whhhheeeee! Mediterranean Blue by Valspar.  I personally haven't used Valspar before now and I'm kinda in love! I was completely suckered in by their gorgeous color choices.  I only had to go to four, count them, FOUR, stores to find this color! Sheesh.  I have love, love, loved the way this went on!  Here she is... all ready for the front porch!


Ahhh... so in love!  The color on the right is more true to life, but I wanted to show you the new seat all painted.  And you see that cushion?  I recovered the original cushion that came with the chair.  Didn't think I knew how to sew?  Guess what?  I don't!  See how I covered the custom cushion without sewing a stitch here!

Project Materials:
Wire brushes ($2.98/set of three)
Gorilla Glue- already owned
 2 cans Spray Primer- already owned ($2.98 retail)
1 1/2 cans Valspar Spray Paint in Mediterranean ($3.78 ea. at Lowe's)
 Approximate total:  $17

Not bad! I'm pretty thrilled with the results!
Pin It
DIY Club

Wednesday, September 7, 2011

The Peeling Paint That I Love! {Tips}

Have you guys seen this??  There are Teflon coated paint trays now!  I saw this at Lowe's the other day and couldn't believe it!  No more liners? No more scrubbing?  I don't know about you,but I hate cleaning out a paint tray, and I also hate to keep buying liners to through away.  I am forever stuck wanting to start a painting project and not having a new liner. I don't know, maybe I'm behind the times, maybe these have been out for years.  But I hadn't seen them, and I was excited! So, I had to buy one (they only run about $6 by Shur-Line).

I worked on my project, then dumped the unused paint back in the paint gallon, and let the paint tray sit out until it was dry.  By the next day everything was dry.  I peeled back a corner and....


Just pulled it off!

Good bye old paint!

Hello clean pan! 

I think I'm more excited than the 1950's housewife who got her first teflon baking dish! Of course I use these pans more than the ones in the kitchen! : )

Thursday, September 1, 2011

Kitchen Update


Well, for most of August we've been working on the kitchen.  Bead board installation went smoother than I thought (future post coming on that). 


These are some rough pictures before I prepped the trim for painting.  There were a few surprises along the way, like using more trim in more places than I realized.   I also learned how to use the table saw without chopping off my fingers, which is a good thing!  And I had so much fun using my new nail gun with the air compressor (thanks Dad!). Priming is in full swing and I'm so close to getting some great color in the kitchen- I can't contain myself!

I couldn't help it, when I went to Menards to pick up more primer and trim paint... I had to get the wall color.  What better thing to do while you are waiting for primer to dry than to get some color on the walls!

As always I had last minute deliberations with the paint color.  I came so close to getting the turquoise color that matches our Fiesta Ware to put on the walls.  A gallon of it actually came home with me.


But I think I'm going to go the safe route and use this gorgeous buttercream (Dutch Boy Honey Bear) on the walls.  I think it will really warm up the kitchen (and make the hubs happy!).


I have to say I love the Dutch Boy Color Visualizer.  Have you ever seen this program?  This program was available at my local Menards.  I was able to plug my exact colors in along with a guess on the new countertop color (Spiced Java).

 Once I saw the colors together in a sample kitchen I was sold on the Honey Bear/Lambswool White combo.  Apparently you can purchase the CD from  Dutch Boy and even download a picture of your room that you are working on.  Cyndy, over at her fabulous blog, The Exchange, just posted about using the new brochures that were created by Sherwin-Williams and HGTV.  They have some pretty inspirational pictures and unique color combos.  What's your favorite way to pick the color of your room?
Related Posts Plugin for WordPress, Blogger...