Welcome to my Home!

Thanks for stopping by! I'm so glad you're here and hope you take the time to look around. There's going to be a lot of before and afters, ideas, inspiration, tips, tutorials, and whatever else I come upon during my journey of home renovation and decoration. We'll see where it takes us!

Showing posts with label furniture. Show all posts

Monday, September 19, 2011

No Sew Custom Pillow {DIY}

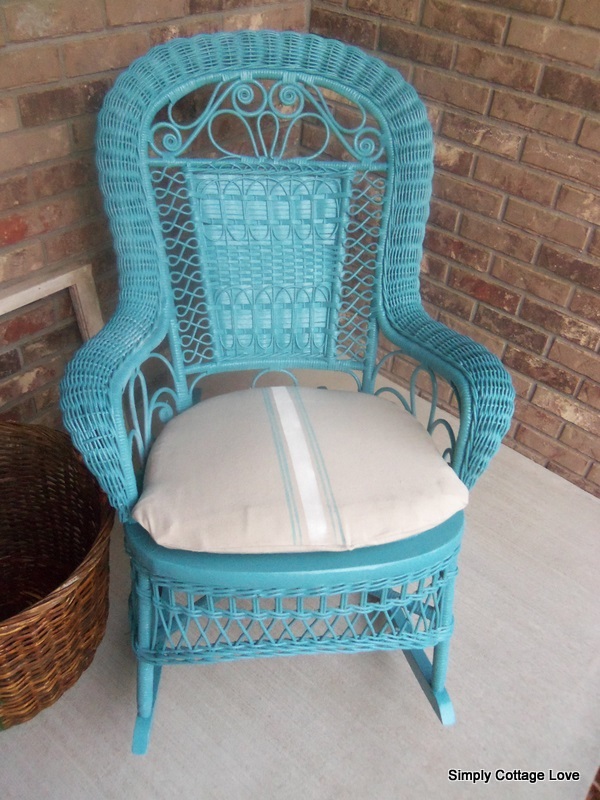
I just added a new wicker rocker to my front porch.  You can check out that transformation here.  I was lucky to have the custom made cushion that came with this antique piece.    My problem was the fabric was a no-go with the turquoise and I have ZERO sewing skills.  I mean, I'm not even sure I'd even know how to turn on a sewing machine!

So... when I stumbled across this post by Beth at Home Stories A2Z I knew there was hope!  She used drop cloth canvas, hemming tape, and fabric glue to create this and other adorable pillows.


She gives a great tutorial on using Scrapblog to create the adorable graphics as well!  

I actually had the supplies I needed stashed away in various places in the house.  I pulled out the drop cloth canvas I got for FREE (yes!) at a garage sale, my Heat n Bond, and my iron.  Instead of using fabric glue, which I didn't have, I improvised and used my glue gun.  Here's what I came up with~


I figured there had to be way to use this technique on a custom shaped pillow.  This particular pillow had all sorts of curves.  Here's a tutorial for those of you that are curious how I did it~
Start with your supplies~

Scissors
Drop Cloth Canvas
Heat-n-Bond (hemming tape, stitch witchery, or the like)
Iron
Glue Gun (not shown)
Acrylic Paints
Sponge Brush
Painters Tape
Pillow that you would like to cover

Trace your pillow onto your drop cloth.  Be sure to trace it onto the side that will be flipped to the inside when you are done (not like I did!).  I'm sure you can use some sort of sewing marker that dissapears... but I didn't have anything like that.  Do this to two pieces of canvas.  


Add two inches to your custom shape.


Cut out your shapes.


Cut your Heat n Bond 

I cut mine in fairly thick strips because I was concerned about it holding up on a thick fabric like the dropcloth.  I followed the curved lines of the cushion.  Leave one side open so that you can slide in your pillow.


Follow the directions on your Heat n Bond package to adhere the two pieces together.  Flip your pillow inside out creating a pocket for your cushion.
  Slide your cushion in.

Sorry, I don't have any pictures of this next step.  What you will do is turn the edges in towards the inside of your pillow leaving a clean seam on the outside.  Run a line of hot glue just a couple of inches long and press this seam together.  Hold for a minute or so until the glue sets.  Be sure to just work with a small section at a time.  Work your way across the open seam until you have secured the pillow inside.  That's it!

The blank canvas wasn't doing much for me so I added some stripping to it using some acrylic paints I had on hand.  


Just measure... (my center line was 1" wide, and each blue stripe was 1/8" wide)

tape...

and paint.


I'm pretty happy with how it turned out.  I'm sure it could've been better if done with a sewing machine, but for those of us who can't sew~ this works out just fine!
Todays Creative Blog

Tip Junkie handmade projects

Monday, September 12, 2011

Turquoise Rocker {DIY}

Lucky for me the MIL is is downsizing... sweet!  I have been the lucky recipient of two couches, an entertainment hutch, a rocker, and a coffee table, to name a few.  And that's just in the last couple of months.  Good for me she has great taste! Here's the latest giveaway (almost throw away) off my mother in law's front porch.  Supposedly she bought this years ago from an antique shop.  Looks like it's had better days!

This is where we started out-  layers and layers of paint, a torn woven seat, and a variety of injuries endured through the years.  So we ripped out the seat, knowing there was no way we could fix it.  We had to come up with a new plan for that seat.


There's nothin' that Gorilla Glue can't fix (what?! you broke your gorilla?!).  Love this stuff, I've used a few times now and have been really happy with the durability and how easy it is to work with.

We grabbed some wire brushes and went to work.  Even the kids loved helping with this job.  It was hard to get to a point where the paint would stop chipping off, but we tried to get as much off as possible to get a good base for the new paint.


We had to get creative to make a new seat~

I used some scrap bead board I had laying around from the kitchen project and cut a new seat (thanks sweetie!).  A little adhesive called Power Grab and the handy dandy nail gun and she was all set!

  I got busy with a good solid coat of spray primer.  And then came the fun stuff!

Whhhheeeee! Mediterranean Blue by Valspar.  I personally haven't used Valspar before now and I'm kinda in love! I was completely suckered in by their gorgeous color choices.  I only had to go to four, count them, FOUR, stores to find this color! Sheesh.  I have love, love, loved the way this went on!  Here she is... all ready for the front porch!


Ahhh... so in love!  The color on the right is more true to life, but I wanted to show you the new seat all painted.  And you see that cushion?  I recovered the original cushion that came with the chair.  Didn't think I knew how to sew?  Guess what?  I don't!  See how I covered the custom cushion without sewing a stitch here!

Project Materials:
Wire brushes ($2.98/set of three)
Gorilla Glue- already owned
 2 cans Spray Primer- already owned ($2.98 retail)
1 1/2 cans Valspar Spray Paint in Mediterranean ($3.78 ea. at Lowe's)
 Approximate total:  $17

Not bad! I'm pretty thrilled with the results!
Pin It
DIY Club
Related Posts Plugin for WordPress, Blogger...